Working with scenarios
Explore mode and Scenario mode
A scenario is a 'play list' of different items. You may get a scenario as a ready-made scenario file (extension .sce) or you can create your own scenarios.
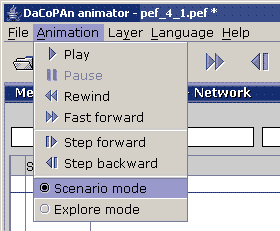
To work with scenarios you need to be in 'scenario mode'. The program is always either in 'explore mode' or in 'scenario mode'. You can switch between the modes at any time, regardless of what kind of file you have loaded. You switch the mode in the Animation menu, see picture below.

You can always see the mode you are in by looking at the bottom left corner of the DaCoPAn animator window. When you are working with the animator, either the EXPLORE or the SCENARIO text is always highlighted with blue color. That tells you which mode you are in.

The only difference between the modes is that in scenario mode you have the 'Scenario play list' dialog where you can select scenario items for viewing. Aside from this dialog, in both of the modes ALL other controls available to the user work in EXACTLY the same way.
Scenario play list dialog
The Scenario play list dialog shows the scenario play list and provides ways for showing and editing the list. When the application is in Scenario mode, the Scenario play list dialog is always either visible on screen or appears as minimized in the status bar (see the picture above in previous section). So, in Scenario mode, the dialog is NEVER completely hidden from view. If the dialog is minimized in the status bar, you can always make it visible by simply clicking on the blue rectangle with the text "Scenario play list".
Viewing scenarios
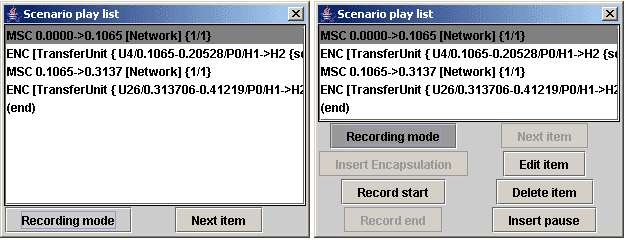
If you just want to view scenarios, make sure you are NOT in recording mode. In the image below you see two versions of the dialog. The version on the left has recording mode OFF and the one on right has recording mode ON.

You can always (when not in recording mode) select an item from the list for viewing. The list is intended to be presented from beginning to the end, so unless you want especially to inspect some item on the list, it's most logical to start from the beginning (top). You can always advance to the next item by clicking on the Next item button. When one item is presented, the program will automatically move to the next item on the list. Depending on what kind of items there are on the list, and some settings for those items, the list may play all the way from beginning to end without user input, or the scenario may require that the user presses the Play button (in the toolbar) or the Next item button (in the Scenario play list dialog) for some of the item. For more details, read about the different scenario items in the next section.
Different scenario items
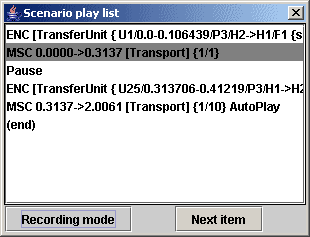
See the image below for another example of a play list.

MSC item
An MSC item means a presentation of the protocol data on the Message Sequence Chart. An MSC item is presented in the play list in this fashion:
MSC 0.3137->2.0061 [Transport] {1/10} AutoPlay
An MSC scenario item contains information about the following:
Start time - A point in time where the presentation of this item starts. In the above example the start time is 0.3137. When the item is selected from the list, the animation time is set to match this time.
End time - A point in time after the start time. In the above example the end time is 2.0061. When the animation is played to (or past) this time, the scenario will automatically advance to the next scenario item. Note that when the item is being recorded, it will exist in such a state that it has a start time but no end time. To mark this the end time is shown just as * (an asterisk).
Layer - Always just one layer where to present the data. In the above example the layer is Transport.
Settings - All the settings that you can access in scenario mode by the Change settings button (in toolbar) or the Edit item button (in Scenario dialog, only in recording mode) will be saved for the item. The settings are saved independently for each list item, so changing settings for one item doesn't affect the settings for any other item. The settings include the scale settings, the visualization settings for the particular layer, and also the 'AutoPlay' setting that is relevant (and available) only in the scenario mode. As an indication about these settings, the above example line has the part "{1/10}". That tells the magnitude of the scale, and corresponds to the radio button selected in the scale settings.
Meaning of the AutoPlay settings: (notice the text "AutoPlay" in the above example line) When AutoPlay is selected, the item is automatically put to Play mode when selected. (Selecting can happen either when the user clicks the item with mouse, or the scenario advances to that item from the previous item.) Notice that the AutoPlay does NOT have effect when the scenario dialog is in recording mode. This is to make it easier to edit the play list.
ENC item
An ENC item corresponds to an encapsulation of a selected unit. As a scenario item the ENC item is very simple. When the item is selected, the animator will present the encapsulation for the selected unit, and wait for the user to select the Quit encapsulation button. When that is done, the scenario will move to the next scenario item. Or alternatively the user can select the Next item button from the scenario dialog, or just select another item from the play list. The are no editable settings associated with an ENC item.
Pause item
A pause item is a 'non-showable' item in the sense that selecting it doesn't cause any change in the visualization mode of the animator. So when a pause item is selected from the play list, what you will see corresponds always to the PREVIOUS 'showable' item that was selected. (Be aware that if you have selected the Pause item by clicking it on the list, the 'previous' item is not necessarily the one directly above the pause on the list, it is the item that was selected before you clicked the Pause item, whatever the previous item was.)
The only functionality of the pause item is that when the pause item is selected, it pauses the currently playing animation and moves it to the end time of the previous scenario item. (See note above for what exactly is the 'previous' item.)
You may want to use a pause item in the list after an MSC item if you wish the presentation to pause before e.g. changing layer or going into encapsulation. By using the pause item you can have the program pause so that the end of the previous MSC item is still visible.
End marker item - "(end)"
This item behaves in much the same way as the pause item. There is always exactly one end marker in the play list - at the end. What is it for? Always, when you add a new item to the play list, it is added BEFORE the item that is currently selected. So, if you want to add something as the last (real) item in the list, you need to select the end marker and then add your item.
Recording your own scenarios
Most of what you need for recording your own scenarios has already been told previously on this section. This chapter will concentrate of some this-far-unexplained features of the recording mode.
When you are in recording mode, your scenario dialog will look like the dialog on the right below:

The buttons have the following meanings:
Recording mode - toggles the recording mode on and off.
Next item - advances to the next item on the list.
Insert encapsulation - Inserts the currently visible encapsulation (only available when one is visible) to the current position in the play list. (Also see the 'Automated recording actions' section below for another way of recording ENC items.)
Edit item - Shows the settings dialog for the current MSC item. Only available when an MSC item is selected.
Record start - Inserts a new MSC item, with the current time as the start time of the item. Only available in MSC mode and only when there are no unfinished MSC items on the list.
Record end - Sets the current end time as the end time for the currently unfinished MSC item. Only available in MSC mode and when there is an unfinished item. If the current time is before the start time of the unfinished item (end time cannot be before start time!), an error message is shown.
Delete item - Deletes the currently selected item.
Insert pause - Inserts a pause in the current position in the list.
Automated recording actions
Always when you are in recording mode, the following recording actions are carried out automatically:
New MSC item is recorded when you press Play - Whenever you press the Play button, a new MSC item is added to the current position in the list. The functionality is as if the Record start button had been pressed simultaneously.
Encapsulation will be inserted when you press Encapsulation - Whenever you press one of the Encapsulation buttons inside the Unit Flow panel, the encapsulation is inserted in the play list as if Insert encapsulation had been pressed.
Finishing unfinished items - Whenever you have an unfinished MSC item on the list (MSC item without an end time) and you try to insert a new item in the list (either explicitly or implicitly) OR change the layer, the program will try to record the current time as the end time for the unfinished item. If this is not possible, an error message is shown and the action you tried to do is cancelled.
These automated actions aim at making the recording of scenarios more intuitive and effortless.
Notes on recording scenarios
By using the Pause items and the AutoPlay settings it is possible to flexibly create scenarios with quite different paces. Using plenty of the AutoPlay you can make scenarios that play from beginning to end with the only necessary user interaction being pressing the 'Quit encapsulation' button to get out of encapsulation mode. Using plenty of the Pause item and not using the AutoPlay feature it's possible to create scenarios that wait for user actions (either the Next item button or the Play button, depending on situation) before any changes in the mode happen.
| < Previous Controlling the animation | Frequently Asked Questions Next > |
